Finn & Cohen CPAs, APC
How To Scan Documents
How to Scan Photos and Documents Without a Scanner
Here are a few suggestions for taking good photos of a document:
- Lighting: Place the document on a flat surface with good lighting. Try to avoid casting a shadow on the document with your hand and phone.
- Placement: Take the photo straight on to avoid any weird angles. This can be done from directly above or at a right angle by propping up the document. Do whichever results in the best lighting/fewest shadows.
- Framing: Make sure to take the photo from far enough away so the entire document is in view. After you take the photo, crop it to the document so you don’t see any of the surroundings.
The Best Way to Scan Documents on iPhone and iPad: Files or Notes
iPhones and iPads have a built-in “Document Scanner” feature. This tool isn’t its own app, but you’ll find it both in Apple’s Files app and the Apple Notes app. A lot of websites suggest using the Notes app to scan a document, and that works fine—but you can also use the Files app, which is convenient if you just want to scan the document to a file.
To scan a document on iPhone or iPad with the Files app, first open the Files app and using "browse" at the bottom left, go to the location you want to save your scanned document to. For example, to save it in your iCloud Drive, open the iCloud Drive location. To save it in your iPhone’s Downloads folder, open Downloads.
Tap the menu button (it looks like a “…”) at the top-right corner of the screen and tap “Scan Documents” to get started.
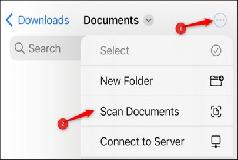
Position the document in view of your iPhone or iPad’s camera and hold it still. Your device will automatically capture an image of the document, and you’ll see it flash on screen. Select "Keep scan" or "Retake" if you don't like the results.

If you have a multi-page document, position the second page in view of your iPhone or iPad’s camera. Continue this process to capture as many pages as you like. When you’re done, tap “Save,” and you’ll get a combined PDF file containing each page.

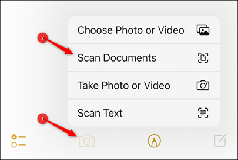
You can also use the Notes app to scan documents. Open the Notes app on your iPhone or iPad, open an existing note or create a new note, tap the camera icon, and tap “Scan Documents.” The Notes app will then save your scanned documents as notes rather than files.
The Best Way to Scan Documents on Android: Google Drive
Google Drive has a lesser-known document scanning feature built-in, too. All you have to do is take a photo of the document, and Drive will do all the work to make it look as clean and clear as possible. This feature is available in Google Drive for Android as well as iPhone and iPad.
To scan a document on Android, first open the app and make sure you’re signed in with your Google account. Tap the floating “+” button in the bottom right corner.

Select “Scan” or “Use Camera.”

This will open the camera. You may need to grant the app permission to use your camera. Position the document so that it’s entirely in the frame, then snap the photo.

The next screen will ask you to confirm that you want to use the photo. Tap “OK” or “Use Photo.”
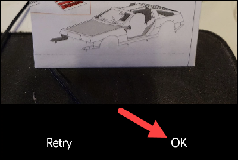
Google Drive will attempt to automatically crop and adjust the lighting. You can manually adjust this with the crop and color buttons. If you have a multi-page document, tap the plus icon to add the next page in the same way.

When the document is looking good, tap “Save” to finish.
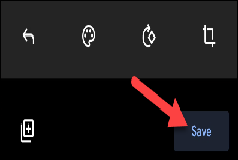
Now you can give the file a name and choose which folder to save it to. The document will be saved as a PDF.

The document is now saved in your Google Drive. You can download it and share it however you’d like.
REMINDER: never attach unencrypted files to email messages, use our secure web portal instead. Go to the Direct Uploads page on this website.